

🪴 Short-flowering, flavor-rich, and dense, perfect for growers wanting bold taste and solid yield in under 2 months of bloom.
Horchata isn’t just another indica-leaning strain, it’s a flavor experience packed with cinnamon, vanilla, and earthy woods, all wrapped in Jet Fuel Gelato × Mochi Gelato genetics. Faster flowering and approachable structure make it ideal for both novice and savvy growers.
This diary will teach you how to grow Horchata strain from germination through harvest, covering:
Ready to grow something that tastes as refined as the classic Mexican treat? Let’s begin.
Before you pop your Horchata strain, make sure your space is optimized. This strain doesn’t ask for much, but if you want top-shelf flavor and tight nugs, the environment control is key.

| Phase | Temp (°F) | Humidity (%) | Light Cycle |
|---|---|---|---|
| Germination | 75–80 | 70–80 | 18/6 |
| Veg | 72–78 | 60–70 | 18/6 |
| Flowering | 68–75 | 40–50 | 12/12 |
| Drying | 60–65 | 50–55 | Dark |
🎯 Horchata doesn’t stretch too much, perfect for small tents and stealth grows. Keep your setup stable and clean from day one to avoid pest or mold issues later.
Horchata strain germinate fast and strong when kept warm, dark, and lightly moist. Skip the soaking step, Hypno Seeds guarantees germination only with the paper towel method.
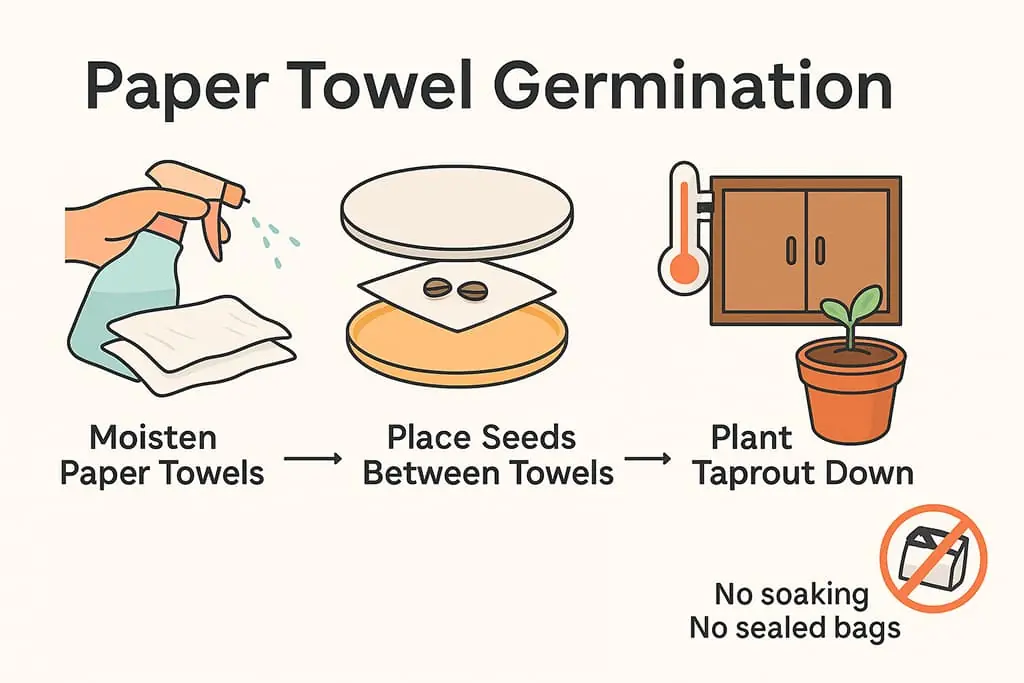
🚫 Do not seal the setup (no Ziplocs or Tupperware); lack of airflow can cause seeds to rot.
📘 For a more detailed walkthrough, including common mistakes to avoid, check out our full Germination Guide for Photoperiod & Autoflower Seeds.
Once your sprouted Horchata seed is nestled into soil or coco, it enters the seedling phase. This week is all about gentle care and avoiding overwatering. Keep light intensity low to avoid stressing the baby plant.
🧪 Nutrients:
🪴 By the end of Week 1, your Horchata should be short, sturdy, and showing her second set of serrated leaves. A healthy start here = a smooth grow ahead.
This is when things start moving. Your Horchata seedling shifts from “baby mode” into true veg, focusing on root mass and new leaf production. You’ll notice vertical growth and leaf sets stacking faster.
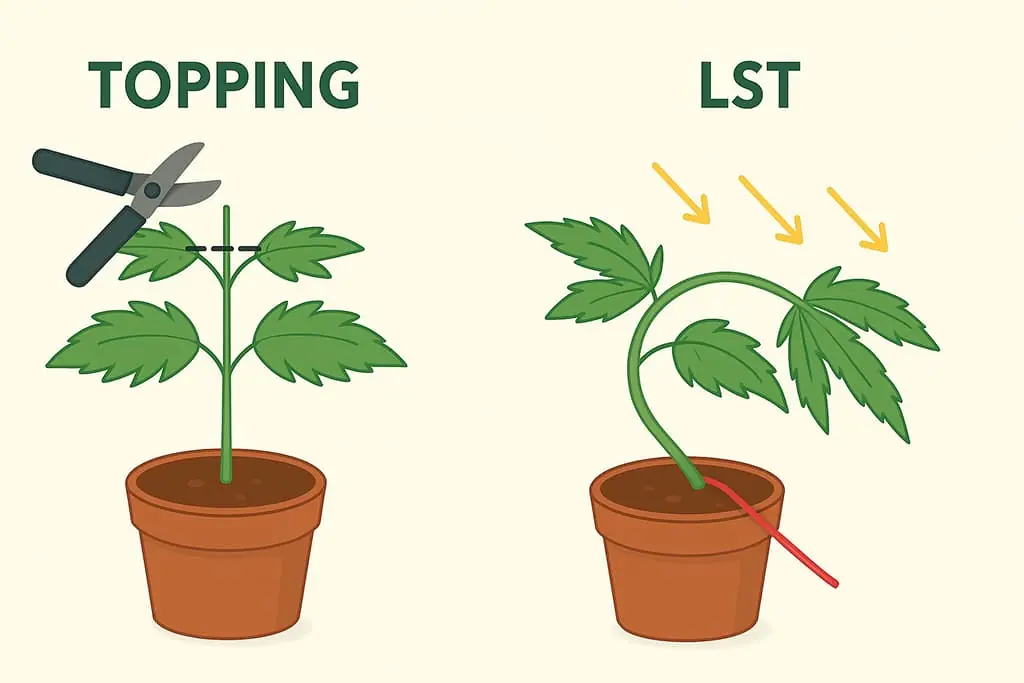
If your plant is strong, you can start planning LST (Low Stress Training) next week. For now, let it grow unimpeded.
🪴 By the end of Week 2, your Horchata should be short, leafy, and eager to explode into vegetation. Next week is all about acceleration.
This is where Horchata kicks into high gear. With strong roots in place, the plant starts stacking new nodes and broad fan leaves. It’s also your window to start LST (Low Stress Training) or topping to maximize bud sites.
🪴 By the end of Week 3, Horchata should be wide, vibrant, and well on her way to multiple colas, training now means fatter buds later.
This is the last week of vegetative growth for most indoor Horchata grows. Your plant should now have a strong, open canopy, and be ready to flip to 12/12. Think of this week as your last chance to shape the structure and boost resilience.
🧹 Make sure your grow space is clean, stable, and pest-free before flower. Once you flip to 12/12, everything happens fast.
🪴 By the end of Week 4, Horchata should look like a mini forest, vibrant, symmetrical, and ready to bloom.


Time to flip the switch. Switching your light schedule to 12/12 signals Horchata to transition from veg into flowering. You won’t see buds just yet, this week is about the hormonal shift and pre-flower stretch.
🪴 By the end of Week 5, Horchata will show her first signs of flower, thin white pistils, and a stretch in every direction. The flavor factory has opened.
Now that the stretch has slowed, Horchata shifts focus to building tight, frosty flower clusters. You’ll see white pistils multiplying and calyxes stacking at each bud site. This week kicks off the visual payoff.
🧹 By the end of Week 6, you’ll have visible buds forming on every cola, with a sweet and spicy aroma starting to fill the tent.
This is one of the most satisfying weeks. Your Horchata buds will fatten significantly, pistils will start to curl inward, and trichomes will spread across the sugar leaves. The smell? Sticky vanilla, cinnamon, and sweet woods, like a dessert shop during harvest.
🪴 By the end of Week 7, your Horchata plant should be fully shaped, stacked with glistening buds, and smelling like a spiced vanilla dream.
This is the final bloom week for most Horchata grows. Buds won’t get much bigger, now they’re maturing, ripening, and pumping out flavor. Trichome color becomes your guide, not the calendar.

🪴 By the end of Week 8, you’re either harvesting or entering a short extension, based on your trichomes.
When your trichomes are mostly cloudy with a touch of amber, it’s go-time. Horchata finishes fast, many phenos are ready by Day 56–60, especially indoors. Now, it’s all about how you harvest and dry, not just when.
| Factor | Ideal Range |
|---|---|
| Temp | 60–65°F |
| Humidity | 50–55% |
| Duration | 7–10 days |
| Airflow | Gentle, indirect |
🪴 Horchata’s thick colas mean mold is a risk, check daily and trim any overly dense spots if needed.
Curing takes your Horchata from “decent smoke” to “top-shelf masterpiece.” This slow process improves smoothness, enhances flavor, and preserves potency. It’s optional for impatient growers but essential for connoisseurs.
🧪 Use mini hygrometers in your jars if possible, Horchata hits her terpene peak around 60% RH.
🥂 After a 4-week cure, expect creamy, earthy buds with a cinnamon-vanilla backbone and a balanced euphoric high.
Learning how to grow Horchata strain is about more than just following a schedule, it’s about tuning into your plant’s rhythm. With her rich flavors of cinnamon, vanilla, and fresh woods, Horchata delivers not only visually stunning buds but also an uplifting, sociable high that satisfies every type of grower.
Whether you’re a first-timer or a seasoned grower chasing flavor and frost, this strain delivers fast results, balanced effects, and massive bag appeal, all within just 8 weeks of flowering.
🔗 Ready to grow your own Horchata?
Shop Horchata Seeds at Hypno Seeds


I planted 10 Super Boof seeds, and all germinated without a hitch. The plants grew strong and healthy, producing dense, frosty buds with a sweet, earthy aroma. The high is uplifting yet relaxing—a perfect balance. Impressive yield too, even with minimal effort

I’ve been growing weed for 30+ years, and to be honest, it’s quite difficult to surprise me. After a few decades of facing different strains, changing growing conditions, and solving whatever problem you could possibly think of, by then, I believe I’ve seen it all in cannabis growing.
Gary Payton defied every single one of my expectations.
The plant thrived, growing to an impressive 6 feet in what seemed like a blink of an eye. It quickly filled out with buds and displayed better smell each day, showing solid proof of superior genetics. The buds were tight, aromatic, and a source of immense pride, surpassing the outcome of many of my previous endeavors.
Hypno Seeds with their Gary Payton strain has won my complete admiration and loyalty. Outstanding genetics in this plant have truly turned what I always thought of to be an experiment with negligible expectations into one of the most satisfying grows of my long career.
Looking forward, my excitement for the next growing season is unparalleled. I can’t wait to see how much I can take these strains, especially with the attention that Gary Payton really does deserve right from the start.

TRUE MAGIC! This strain really stands out. I am trying Hypno Seeds for the first time and I surely made the right choice. I will be ordering more RS11 seeds just to keep this beauty in my garden for the upcoming season. Growing in Virginia and it’s only shown perfection by now.

Starting my latest grow, I decided to try out some Blackberry Kush from Hypno… I planted her on a whim alongside my other favorites. Hypno Seeds said it had to be a powerful plant with rich, fruity scents… Seeing is believing. She developed purplish hues and dense resin coated buds and quickly took center stage in my garden and produced much more than expected. The buds are tightly packed, literally bursting with the heady aroma. The yield? Very impressive for her conditions…
Germinated three seeds using the paper towel method with100% success rate within 48 hours. Planted in 5 gallon pots with living soil under a 315W CMH light. Plants remained compact (3.5 ft) with thick lateral branching, showing high resistance to humidity and minor nutrient fluctuations. Yield per plant: 5.8 oz of extremely dense, trichome-heavy buds. Smell profile during flower: sharp pine, pepper, and a hint of citrus. Harvested at week 9, after trichomes showed 30% amber for peak sedative effects. Smoke report: Potent. Deep relaxation without full sedation. Ideal for stress relief.
